Want to Help?
Please call or Email EWE to reserve your kit!
EWE Fibers
617 W Main St,
Charlottesville, VA 22903
For Hours:
Questions?

Pattern and Tutorial
Thank you for sewing masks! We are doing this project in conjunction with UVa hospital and the bioengineering department of UVa to provide nurses with adequate PPE equipment to help protect them during the current COVID-19 epidemic. We are in the process of lab testing this design for porosity, and have worked closely with the staff at UVa hospital to develop a fit and design that works for their staff. We are aiming to make at least 1000 masks for UVa by the beginning of May. Thank you for being part of this volunteer effort!
This mask is designed to provide maximum protection against water molecules carrying the virus. It is designed to fit closely around the head with double strands of elastic and closely around the nose with a rubber-covered metal insert. It is designed with a side opening and a bottom opening to receive a replaceable filter insert, and when the filter is removed, it can be washed in hot water, or a sanitizing cycle of a washing machine.
Please be sure to wash your hands and work surface before you start to reduce transmission as these masks are getting handled by multiple volunteers. They will be sterilized before use by medical staff. There is no need to wash the masks when they are finished.
These masks are being distributed in kits. In each kit you will find:
Pattern and instructions
A piece of fabric 36" x 116"
12 Nose wires
12 Elastics
12 Safety pins
Please contact us if you need any help assembling the masks in your kit. These kits are to be returned to EWE fibers to be distributed to the nurses at UVa hospital. They are not for personal use.
Pay attention to seam allowance for each step. Please backstitch the beginning and end of each seam. Note: We have found it easiest to do one step at a time on multiple masks, assembly-line style. Each mask takes about 20 minutes if you do them one at a time.
Step By Step Tutorial

Before you begin: Cut 24 lining pieces and 24 mask outers. Seam allowances are included in the pattern pieces. Please be as efficient with the fabric as you can. If you have extra fabric, please return it in a separate bag. The patterns are both in your kit, and in the pdf at the end of this set of instructions.
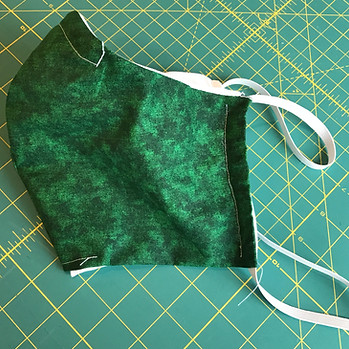
(Your mask fabric is all white, 300 thread count organic cotton. For this tutorial, the outer fabric is green, and the lining fabric is white.)

1. Center front seam: Sew center front seam (curved edge) of both the lining and mask outer with a 3/8” seam allowance

2. Sides— Turn under 3/8” on the front and back, and sew. (This hems the side edges of the mask pieces

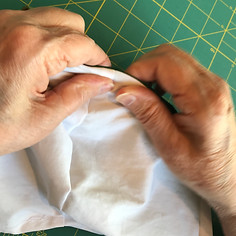
3. Put the mask outer and lining with right sides together, line up center seams pin top and bottom edges. Mark 4” opening along the bottom (see pattern) (Note-- the bottom edge of the mask is facing up in this picture)

4. Sew top seam (with the nose curve) with a 5/8” seam allowance.
5. Sew bottom (straight edge) with a 5/8” seam allowance. Leave 4” open at center, see pattern for markings (to allow the insert to be placed properly)

6. Turn right side out and press. Pay attention to pushing the seams out fully from the inside.

7. Make elastic plackets: Fold edges of mask outer to meet but not overlap the edge of the lining, making sure you leave enough room for the elastic to be threaded and move freely in the placket. Sew edge of the placket. Do not include edge of lining.
8. Hem each side of bottom opening.

9a. Place green wire inside the mask under top nose seam, pushing it against the inside of the top seam.


9b. Sew around the green wire creating to hold in place.

10. Put the safety pin on one end of the elastic.
11. Thread the elastic through both the plackets on both sides, and pin elastic together at the back. It should create a double loop to go behind the head of the wearer.

12. Trim threads

Put all of the masks back in the plastic bag, and return to EWE Fibers at:
617 W Main St,
Charlottesville, VA 22903
Phone: (434) 409-9095
